Preparing for a Smooth and Successful Experience in Your London Home
Introduction
Floor sanding is a fantastic way to rejuvenate your wooden floors, giving them a fresh and beautiful look. Understanding what to expect during a floor sanding project can help you prepare and ensure a smooth process. In this guide, we’ll walk you through the key stages of a floor sanding project and provide tips to help you get ready for the transformation of your London home.
Initial Consultation and Inspection
The first step in a floor sanding project is an initial consultation and inspection. A professional will visit your home to assess the condition of your floors, identify any repairs needed, and discuss your desired outcome. This is the time to ask questions and understand the process.
Preparation and Planning
Once the inspection is complete, the preparation phase begins:
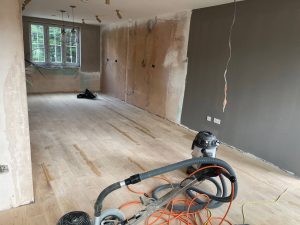
Clear the Room: Remove all furniture, rugs, and personal items from the area to be sanded. Ensure the room is completely empty to provide unobstructed access to the floor.
Seal Off Adjacent Areas: Use plastic sheeting or barriers to seal off rooms adjacent to the sanding area. This helps contain dust and prevents it from spreading throughout your home.
Check for Repairs: Address any necessary repairs, such as filling gaps, fixing loose boards, or replacing damaged sections of the floor.
The Sanding Process
The sanding process itself involves several steps:
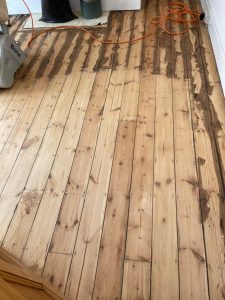
Rough Sanding: The first pass is done with a coarse grit sandpaper to remove the old finish, stains, and any surface imperfections. This step exposes the bare wood.
Intermediate Sanding: The second pass uses a medium grit sandpaper to smooth out the rough surface created by the coarse sanding. This step prepares the floor for the final sanding.
Fine Sanding: The final pass uses a fine grit sandpaper to achieve a smooth and even surface. This step is crucial for creating a flawless finish.
Edging and Corners: Special attention is given to edges and corners using an edging sander to ensure these areas are as smooth as the main floor.
Dust Containment
Modern floor sanding techniques involve dust containment systems to minimise the spread of dust. While some dust is inevitable, professionals use equipment designed to capture most of it, keeping your home as clean as possible during the process.
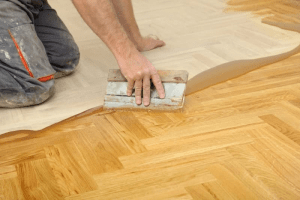
Staining and Finishing
After sanding, you can choose to stain the floor if you want to change its colour:
Applying Stain: If you opt for a stain, it will be applied evenly across the sanded floor. The stain enhances the wood’s natural beauty and can be customised to your preference.
Sealing and Finishing: Once the stain is dry, a protective finish is applied. This can be a polyurethane, varnish, or oil-based finish, providing durability and enhancing the appearance of the wood.
Drying and Curing: The finish needs time to dry and cure. Avoid walking on the floor during this period to ensure a flawless finish.
Post-Project Cleanup
After the sanding and finishing are complete, professionals will clean up the area, removing any remaining dust and debris. They will also conduct a final inspection to ensure the work meets your satisfaction.
Maintenance Tips
To keep your newly sanded floors looking beautiful:
Use protective pads under furniture legs to prevent scratches.
Clean regularly with a soft broom or vacuum designed for hardwood floors.
Avoid excessive moisture and wipe up spills immediately.
Consider periodic maintenance, such as buffing and recoating, to maintain the finish.


Customer Testimonials: Real Stories of Floor Sanding Success
Hearing from satisfied customers is one of the best ways to understand the value and[Read more...]
Buffing and one coat finish
[Read more...]
The Impact of Floor Sanding on Home Value
The Impact of Floor Sanding on Home Value Enhance Your London Home’s Value with[Read more...]
How to Handle Floor Stains from Pets
How to Handle Floor Stains from Pets Pets bring joy and companionship to our homes,[Read more...]
Wood Floor Maintenance
[Read more...]
Floor Sanding for Commercial Properties: What You Need to Know
Floor sanding is not only essential for residential spaces but also plays a crucial role[Read more...]
The Benefits of Floor Sanding for Pet Owners
The Benefits of Floor Sanding for Pet Owners As a pet owner, maintaining beautiful[Read more...]
The Ultimate Checklist for Floor Sanding Preparation
The Ultimate Checklist for Floor Sanding Preparation Ensure a Smooth and Efficient Floor Sanding[Read more...]
Floor Sanding FAQs: Everything You Need to Know
Floor sanding is a popular method for rejuvenating wooden floors, but it often comes with[Read more...]
Carpet removal
[Read more...]