If you’re a homeowner in London looking to rejuvenate your wooden floors, floor sanding can be a rewarding DIY project. While professional floor sanding is often recommended for the best results, you can achieve impressive outcomes by following a systematic approach. Here’s a comprehensive guide to the step-by-step floor sanding process for beginners.
1. Preparation is Key
Before you begin sanding, proper preparation is essential to ensure a smooth and successful process.
Gather Your Tools and Materials:
- Floor sander (hire from a local tool rental shop)
- Edge sander
- Sandpaper (coarse, medium, and fine grits)
- Vacuum cleaner
- Safety gear (goggles, dust mask, ear protection)
- Wood filler
- Soft cloths
Clear the Room:
- Remove all furniture and décor from the room.
- Ensure there are no nails or staples protruding from the floor.
Inspect the Floor:
- Check for any loose floorboards and secure them.
- Fill any gaps or cracks with wood filler and let it dry completely.
2. Start with Coarse Sanding
The initial sanding removes the old finish and levels the surface.
Use a Coarse Sandpaper:
- Attach coarse grit sandpaper (around 40-60 grit) to the floor sander.
- Begin sanding in the direction of the wood grain.
- Keep the sander moving steadily to avoid creating dips.
Sand the Edges:
- Use an edge sander for areas the floor sander cannot reach.
- Sand the perimeter of the room and around obstacles.
3. Medium Sanding for Smoothing
After the coarse sanding, switch to a medium grit sandpaper to smooth out the surface.
Attach Medium Grit Sandpaper:
- Use 80-grit sandpaper for this step.
- Repeat the sanding process, ensuring even coverage across the floor.
Vacuum Thoroughly:
- Clean up all dust and debris using a vacuum cleaner.
- Wipe down the floor with a damp cloth to remove any remaining dust.
4. Fine Sanding for a Perfect Finish
The final sanding step uses fine grit sandpaper to achieve a smooth, polished finish.
Attach Fine Grit Sandpaper:
- Use 120-grit sandpaper for the final pass.
- Sand the entire floor, maintaining a steady pace.
Edge Sanding Again:
- Use fine grit sandpaper on the edge sander to finish the edges.
- Ensure all areas are smooth and free of scratches.
5. Cleaning and Preparing for Finish
After sanding, thorough cleaning is crucial before applying any finish.
Vacuum and Dust:
- Vacuum the floor meticulously to remove all dust.
- Wipe down the floor with a tack cloth to pick up any remaining particles.
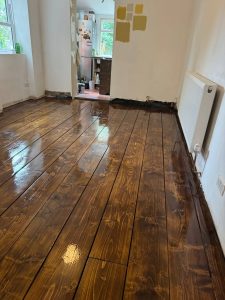
6. Applying the Finish
Choose the finish that best suits your style and the function of the room.
Select Your Finish:
- Options include oil-based polyurethane, water-based polyurethane, or a penetrating oil finish.
- Consider the room’s use and desired appearance when choosing.
Apply the Finish:
- Follow the manufacturer’s instructions for application.
- Use a brush or roller to apply the finish evenly.
- Allow the first coat to dry completely, then lightly sand with a fine grit sandpaper.
- Clean the floor again and apply subsequent coats as recommended.
7. Drying and Curing
Proper drying and curing time is essential for a durable finish.
Allow Adequate Drying Time:
- Ensure the room is well-ventilated.
- Avoid walking on the floor until it is fully dry.
Cure for Durability:
- The floor finish may require a few days to fully cure.
- Avoid placing furniture or heavy items on the floor until it is fully cured.
Conclusion
Floor sanding is a detailed process that requires patience and attention to detail. For beginners, following these step-by-step instructions can help achieve professional-looking results. While it can be a satisfying DIY project, don’t hesitate to consult or hire professionals for larger or more complex jobs. Whether you’re looking to enhance the beauty of your home or prepare it for sale, a well-sanded and finished floor can make a significant difference. Embrace the process, and enjoy the transformation of your floors.


Floor sanding and renovation and installation services in Bromley
Bromley: A Blend of Suburban Comfort and Urban Convenience Bromley is a large and vibrant[Read more...]
The Best Practices for Sanding Pine Floors
The Best Practices for Sanding Pine Floors Achieve a beautiful finish with these tips[Read more...]
How to Handle Floor Stains from Spills and Accidents
How to Handle Floor Stains from Spills and Accidents Spills and accidents are inevitable,[Read more...]
Gallery 08 – Sand and varnish finishing HERRINGBONE wooden floor
[Read more...]
Sep
How to Deal with Floor Cupping and Crowning Before Sanding
How to Deal with Floor Cupping and Crowning Before Sanding Effective methods[Read more...]
The Importance of Professional Inspections Before Sanding
The Importance of Professional Inspections Before Sanding Ensure your London home is prepared for[Read more...]
Floor Board Fitting
Installing, Fitting, sanding and finishing different types of flooring takes a lot of work. when[Read more...]
Sep
How to Create a Seamless Transition Between Rooms with Floor Sanding
How to Create a Seamless Transition Between Rooms with Floor Sanding Achieve a uniform[Read more...]
The Benefits of Using a Professional Floor Sanding Service
The Benefits of Using a Professional Floor Sanding Service Enhance the Beauty and Longevity[Read more...]
The Benefits of Hiring a Local Floor Sanding Expert
The Benefits of Hiring a Local Floor Sanding Expert Enhancing Your London Home with[Read more...]