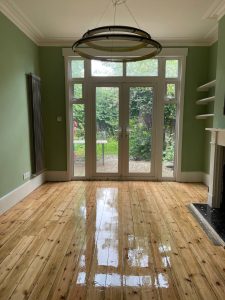
How to Create a Vintage Look with Floor Sanding and Finishing
Creating a vintage look for your floors can add character and charm to your London home. With the right floor sanding and finishing techniques, you can achieve a timeless aesthetic that blends seamlessly with both traditional and contemporary interiors. This guide will take you through the steps to create a beautiful vintage floor that will enhance the beauty of your living space.
Understanding the Vintage Look
The vintage look is characterised by a worn, aged appearance that gives your floors a sense of history and personality. This style often features rich, warm tones, visible grain patterns, and a slightly distressed finish.
Preparing Your Floors
1. Inspect and Repair
Before starting the sanding process, thoroughly inspect your floors for any damage. Repair any loose boards, fill in gaps, and fix any protruding nails. This ensures a smooth and even surface for sanding.
2. Clear the Area
Remove all furniture, rugs, and decorative items from the room. Ensure the area is clean and free from dust and debris to facilitate the sanding process.
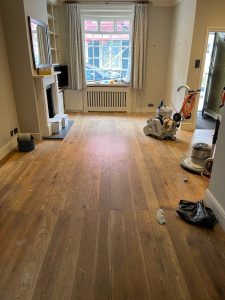
Sanding Your Floors
1. Choose the Right Equipment
For the best results, use a drum sander for the main area and an edge sander for corners and edges. These tools are essential for achieving an even finish.
2. Start with Coarse Grit
Begin sanding with a coarse grit sandpaper (24-36 grit) to remove old finishes and level the surface. Sand in the direction of the wood grain to avoid scratches.
3. Progress to Finer Grits
Gradually move to medium (60-80 grit) and fine (100-150 grit) sandpaper to smooth the surface. Ensure each pass removes the scratches from the previous grit for a flawless finish.
Creating the Vintage Finish
1. Apply a Stain
Choose a wood stain in a warm, rich tone to enhance the vintage look. Apply the stain evenly using a brush or rag, following the wood grain. Allow it to penetrate the wood for the recommended time before wiping off any excess.
2. Distressing Techniques
To achieve a distressed, aged appearance, use techniques such as hand-scraping, wire brushing, or adding faux wormholes. These methods create a worn look that adds character to your floors.
3. Seal the Floor
Finish your vintage look with a high-quality sealant. Oil-based polyurethane or wax finishes are ideal for vintage floors, as they provide a warm, natural glow. Apply multiple coats, allowing each to dry completely before adding the next.
Maintaining Your Vintage Floors
Once you’ve achieved the perfect vintage look, proper maintenance is key to preserving it:
Regular Cleaning: Sweep and vacuum regularly to remove dirt and prevent scratches.
Use Protective Pads: Place felt pads under furniture legs to avoid damage.
Avoid Excess Water: Use a damp mop for cleaning and avoid excessive moisture, which can damage the finish.
Conclusion
Creating a vintage look with floor sanding and finishing can transform your London home into a space filled with charm and elegance. By following these steps and using the right techniques, you can achieve a timeless aesthetic that will be the envy of all your guests. For professional floor sanding and finishing services in London, our team is here to help you achieve your dream vintage floors with expert care and precision.


The Importance of Professional Inspections Before Sanding
The Importance of Professional Inspections Before Sanding Ensure your London home is prepared for[Read more...]
Floor sanding and renovation and installation services in Greenwich
Greenwich: A Historic Gem of London Greenwich is one of London’s most historic and picturesque[Read more...]
The Role of Floor Sanding in Allergy Prevention
The Role of Floor Sanding in Allergy Prevention Maintain a healthier home environment in[Read more...]
The Benefits of Refinishing Your Wooden Floors
The Benefits of Refinishing Your Wooden Floors Enhance the Beauty and Value of Your[Read more...]
Pet-Friendly Floor Sanding Solutions
As a pet owner, maintaining beautiful wooden floors while ensuring the safety and comfort of[Read more...]
How to Create a Vintage Look with Floor Sanding and Finishing
How to Create a Vintage Look with Floor Sanding and Finishing Creating a vintage[Read more...]
How Floor Sanding Can Transform Your London Home
Living in London comes with the charm of historic architecture and classic interiors. However, maintaining[Read more...]
Engineered Wood Flooring
Choosing the finishes for your house can be the most exciting part. Wood flooring adds[Read more...]
Sep
How to Choose the Right Floor Sanding Finish for Your Lifestyle
How to Choose the Right Floor Sanding Finish for Your Lifestyle Find the Perfect[Read more...]
How to Plan a Floor Sanding Project for Multi-Story Homes
How to Plan a Floor Sanding Project for Multi-Story Homes Planning a floor sanding project[Read more...]