How to Handle Floor Gaps and Cracks Before Sanding
Expert Tips to Ensure a Smooth and Flawless Finish for Your Wooden Floors in Your London Home
Introduction
Gaps and cracks in wooden floors are common issues that can detract from the beauty of your floors and affect their structural integrity. Addressing these imperfections before sanding is crucial to achieving a smooth and even finish. This guide will provide you with expert tips on how to handle floor gaps and cracks before sanding, ensuring your floors look pristine and flawless.
1. Identify the Cause of Gaps and Cracks
Before addressing gaps and cracks, it’s essential to understand their cause. Common reasons include:
- Seasonal Changes: Wood expands and contracts with changes in humidity and temperature, leading to gaps and cracks.
- Improper Installation: Poor installation techniques can result in uneven flooring and gaps.
- Age and Wear: Over time, wooden floors can develop gaps and cracks due to age and regular wear and tear.
Identifying the cause can help you choose the appropriate repair method and prevent future issues.
2. Gather Necessary Tools and Materials
To effectively handle floor gaps and cracks, gather the following tools and materials:
- Wood filler or putty
- Wood glue
- Putty knife
- Sandpaper (medium and fine grit)
- Floorboard clamps (for larger gaps)
- Clean cloth
- Vacuum cleaner
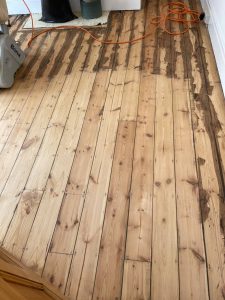
3. Clean the Floor Thoroughly
Before making any repairs, clean the floor thoroughly to remove dust, dirt, and debris. Use a vacuum cleaner to ensure all particles are removed from the gaps and cracks. A clean surface ensures better adhesion of fillers and adhesives.
4. Filling Small Gaps and Cracks
For small gaps and cracks, use wood filler or putty:
- Choose the Right Filler: Select a wood filler or putty that matches the colour of your flooring for a seamless repair.
- Apply the Filler: Use a putty knife to apply the filler into the gaps and cracks, pressing it firmly to ensure it fills the space completely.
- Smooth the Surface: Smooth the filler with the putty knife, removing any excess material.
- Allow to Dry: Let the filler dry according to the manufacturer’s instructions. This usually takes a few hours.
- Sand the Area: Once dry, sand the filled areas with medium and then fine grit sandpaper to achieve a smooth surface.
5. Repairing Larger Gaps and Cracks
Larger gaps and cracks may require additional steps:
- Use Wood Strips: For wider gaps, consider using thin strips of wood coated with wood glue. Insert the strips into the gaps and clamp them in place until the glue dries.
- Floorboard Clamps: For gaps caused by loose floorboards, use floorboard clamps to pull the boards together and secure them with wood glue.
- Fill Remaining Gaps: Once the wood strips or clamps are in place, fill any remaining gaps with wood filler as described above.
6. Final Sanding
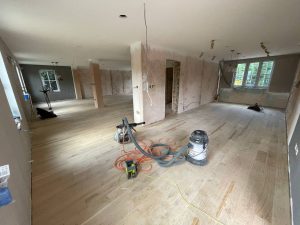
After all gaps and cracks have been filled and repaired, perform a final sanding of the entire floor:
- Use Medium Grit Sandpaper: Sand the entire floor with medium grit sandpaper to level the surface and remove any rough patches.
- Finish with Fine Grit Sandpaper: Sand the floor again with fine grit sandpaper to achieve a smooth, even finish.
- Clean the Floor: Vacuum the floor to remove all dust and debris, ensuring a clean surface for finishing.


Gallery 02 – Sand and varnish
[Read more...]
Sep
The Impact of Floor Sanding on Home Aesthetics
The Impact of Floor Sanding on Home Aesthetics Transform your London home with[Read more...]
How to Deal with High Traffic Areas on Sanded Floors
How to Deal with High Traffic Areas on Sanded Floors Protect and Maintain[Read more...]
Floor sanding and renovation and installation services in Croydon
Croydon: A Dynamic and Diverse London Borough Croydon is a bustling and diverse borough located[Read more...]
Wood Floor Maintenance
[Read more...]
Floor Sanding and Allergies: Creating a Healthier Home
Living in a vibrant city like London offers many benefits, but it also means dealing[Read more...]
The Benefits of Hiring a Certified Floor Sanding Professional
The Benefits of Hiring a Certified Floor Sanding Professional Maintaining the beauty and integrity[Read more...]
How to Plan a Floor Sanding Project Around Your Schedule
How to Plan a Floor Sanding Project Around Your Schedule Efficient project management[Read more...]
Floor Board Fitting
Installing, Fitting, sanding and finishing different types of flooring takes a lot of work. when[Read more...]
Sep
The Importance of Ventilation During Floor Sanding
The Importance of Ventilation During Floor Sanding Expert Tips to Ensure a Safe and[Read more...]