How to Handle Adhesive Residue Before Floor Sanding
Effective methods to prepare your wooden floors for sanding in your London home
Understanding the Importance of Removing Adhesive Residue
Adhesive residue from old flooring materials, such as carpets or vinyl, can interfere with the floor sanding process. Proper removal of this residue is crucial to ensure a smooth and even finish. Here’s how to effectively handle adhesive residue before floor sanding:
Materials and Tools Needed
Before you start, gather the necessary materials and tools:
- Adhesive remover or solvent
- Scraper or putty knife
- Heat gun (optional)
- Protective gloves and goggles
- Rags or cloths
- Bucket of warm, soapy water
- Vacuum cleaner
Step-by-Step Guide to Removing Adhesive Residue
Follow these steps to effectively remove adhesive residue from your wooden floors:
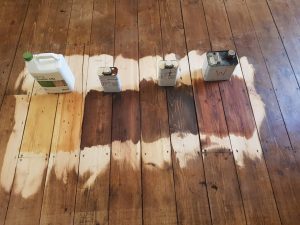
1. Test the Adhesive Remover
Choose a small, inconspicuous area of the floor to test the adhesive remover or solvent. This ensures it doesn’t damage the wood. Follow the manufacturer’s instructions for application and removal.
2. Apply the Adhesive Remover
Once you’ve confirmed the adhesive remover is safe for your floors, apply it to the affected areas. Use a generous amount to cover the residue completely. Let it sit for the recommended time, usually 15-30 minutes, to soften the adhesive.
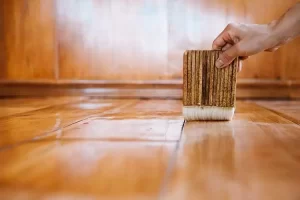
3. Scrape Off the Adhesive
After the adhesive remover has softened the residue, use a scraper or putty knife to carefully remove it. Work gently to avoid damaging the wood. For stubborn areas, reapply the adhesive remover and repeat the process.
4. Use a Heat Gun (Optional)
If the adhesive is particularly tough, a heat gun can help. Use the heat gun on a low setting to soften the adhesive, then scrape it off. Be cautious with the heat gun to avoid scorching the wood.
5. Clean the Floor
Once the adhesive residue is removed, clean the floor with warm, soapy water and a rag to remove any remaining solvent or adhesive. Rinse the floor with clean water and dry it thoroughly.
6. Vacuum the Area
Vacuum the floor to remove any debris or dust left from the scraping and cleaning process. This ensures the surface is completely clean before sanding.
Preparing for Sanding
With the adhesive residue removed, your floors are ready for sanding. Here are some final preparation steps:
1. Inspect the Floor
Check the floor for any remaining adhesive or damage that needs to be addressed before sanding. Ensure the surface is smooth and clean.
2. Protect the Area
Cover doorways, vents, and other areas to contain dust during the sanding process. Use plastic sheeting and tape to create a barrier.
3. Choose the Right Sandpaper
Select the appropriate grit sandpaper for your initial sanding pass. Coarser grits (such as 40 or 60) are ideal for removing old finishes and leveling the surface.
Benefits of Professional Help
Removing adhesive residue and sanding floors can be a challenging task. For the best results, consider hiring professional floor sanding services. Professionals have the expertise and equipment to ensure a smooth, even finish. If you’re in London and need expert assistance, contact us today. Our experienced team is here to help you restore and maintain the beauty of your wooden floors.


The Best Finishes for Sanded Floors: A Comprehensive Guide
Choosing the right finish for your sanded floors is crucial in achieving the perfect look[Read more...]
Floor sanding and renovation and installation services in Richmond
Richmond: A Jewel of London’s Green Boroughs Richmond is one of London’s most desirable and[Read more...]
The Role of Floor Sanding in Allergy Prevention
The Role of Floor Sanding in Allergy Prevention Maintain a healthier home environment in[Read more...]
Common Floor Sanding Mistakes and How to Avoid Them
Floor sanding is a fantastic way to rejuvenate your wooden floors, giving them a fresh,[Read more...]
Understanding Grit Sequences in Floor Sanding
Understanding Grit Sequences in Floor Sanding Achieving the Perfect Finish for Your London Home[Read more...]
Innovations in Floor Sanding Technology
The field of floor sanding has seen significant advancements in recent years, making the process[Read more...]
The Role of Floor Sanding in Property Management
The Role of Floor Sanding in Property Management Introduction Property management involves a wide[Read more...]
How to Handle Floor Stains from Spills and Accidents
How to Handle Floor Stains from Spills and Accidents Spills and accidents are inevitable,[Read more...]
Hardwood vs. Engineered Wood: Which is Better for Sanding?
When it comes to choosing the right flooring for your home, understanding the differences between[Read more...]
Pet-Friendly Floor Sanding Solutions
As a pet owner, maintaining beautiful wooden floors while ensuring the safety and comfort of[Read more...]