How to Create a Seamless Transition Between Rooms with Floor Sanding
Achieve a uniform look in your London home with expert tips and techniques
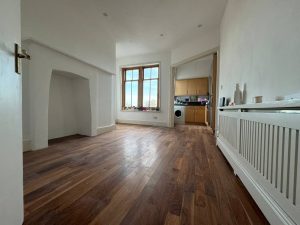
The Importance of Seamless Transitions
A seamless transition between rooms enhances the aesthetic appeal and flow of your home. It creates a cohesive look, making your space feel larger and more connected. Here’s how to achieve a seamless transition between rooms with floor sanding:
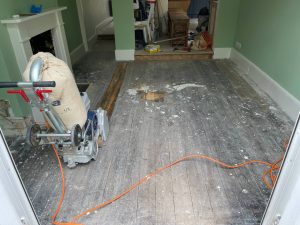
Preparation
Proper preparation is crucial for achieving a uniform look. Follow these steps to prepare your floors:
1. Clear the Area
Remove all furniture, rugs, and personal items from the rooms. This ensures a clear workspace and prevents dust from settling on your belongings.
2. Clean the Floors
Thoroughly clean the floors to remove dirt, dust, and debris. This step is essential for achieving a smooth sanding process and a flawless finish.
3. Inspect for Damage
Check your floors for any signs of damage, such as deep scratches, stains, or loose boards. Repair any issues before you begin sanding to ensure a consistent finish.
Sanding Techniques
Using the right techniques and tools is crucial for achieving seamless transitions between rooms. Here are the steps to follow:
1. Use the Same Grit Sandpaper
Ensure you use the same grit sandpaper for all rooms. Start with a coarser grit to remove old finishes and level the surface, then progress to finer grits for a smooth finish.
2. Sand Continuously Between Rooms
When sanding, move continuously between rooms without stopping. This prevents noticeable differences in texture and finish. Sand in the direction of the wood grain to achieve a smooth and even surface.
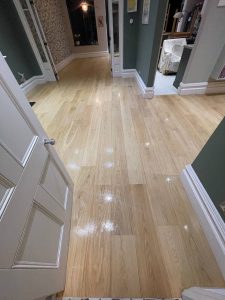
3. Pay Attention to Doorways
Doorways are critical points for seamless transitions. Use a hand sander or edge sander to ensure the floorboards align perfectly between rooms. Blend the edges carefully to avoid visible lines or height differences.
4. Check for Consistency
Periodically check the floors for consistency in texture and finish. Make any necessary adjustments during the sanding process to ensure a uniform appearance.
Finishing Touches
After sanding, the finishing touches are crucial to protect and enhance the beauty of your floors:
1. Clean the Floors
Thoroughly vacuum the floors to remove all dust and debris. Wipe the surface with a damp cloth to ensure it’s clean and ready for finishing.
2. Apply Stain (Optional)
If you want to change the colour of your floors, apply a wood stain. Ensure you use the same stain and application technique for all rooms to maintain a consistent look.
3. Seal the Floors
Apply a sealant or finish to protect the wood and enhance its appearance. Polyurethane is a popular choice for its durability and ease of application. Apply multiple thin coats, allowing each coat to dry completely before applying the next.
Maintaining Seamless Transitions
Proper maintenance is key to preserving the seamless look of your floors. Here are some maintenance tips:
- Regular Cleaning: Sweep or vacuum regularly to remove dirt and prevent scratches. Use a damp mop with a gentle cleaner designed for wood floors.
- Protect from Furniture: Place felt pads under furniture legs to prevent scratches and dents. Avoid dragging heavy furniture across the floor.
- Control Humidity: Maintain a consistent indoor humidity level to prevent the wood from expanding and contracting, which can cause damage.
- Refinish as Needed: Over time, your floors may need to be refinished to maintain their appearance. Follow the same sanding and finishing steps to restore their beauty.
Professional Help
Sanding and finishing floors to achieve seamless transitions can be challenging, especially if you’re not experienced. For the best results, consider hiring professional floor sanding services. If you’re in London and need expert assistance, contact us today. Our experienced team is here to help you restore and maintain the beauty of your floors.


The Role of Floor Sanding in Property Management
The Role of Floor Sanding in Property Management Introduction Property management involves a wide[Read more...]
How to Incorporate Floor Sanding into Your DIY Projects
How to Incorporate Floor Sanding into Your DIY Projects For London homeowners looking to[Read more...]
The Benefits of Floor Sanding for Open House Showings
London Property Tips Home About Contact The Benefits of Floor Sanding for Open House[Read more...]
How to Create a Seamless Transition Between Rooms with Floor Sanding
How to Create a Seamless Transition Between Rooms with Floor Sanding Achieve a uniform[Read more...]
Floor sanding and renovation and installation services in Lewisham
**Lewisham: A Thriving South London Community** Lewisham is a diverse and dynamic area in southeast[Read more...]
Floor sanding and renovation and installation services in Kingston
**Kingston: A Vibrant Historic City** Kingston is a vibrant and historic town located along the[Read more...]
How to Choose the Right Color Stain for Your Sanded Floors
How to Choose the Right Color Stain for Your Sanded Floors Enhance the Beauty[Read more...]
How Floor Sanding Can Transform Your London Home
Living in London comes with the charm of historic architecture and classic interiors. However, maintaining[Read more...]
How to Prepare Your Home for Floor Sanding
Preparing your home for floor sanding is a crucial step to ensure a smooth and[Read more...]
The Benefits of Hiring a Certified Floor Sanding Professional
The Benefits of Hiring a Certified Floor Sanding Professional Maintaining the beauty and integrity[Read more...]