Enhance the beauty and longevity of your wooden stairs with our expert guide.
Introduction
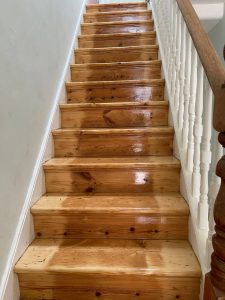
Wooden stairs can add a touch of elegance to any home, but over time, they may show signs of wear and tear. Floor sanding is an effective way to restore the natural beauty of your stairs. Here, we provide techniques and tips to achieve the best results for your stair renovation project in London.
Preparing for Sanding
Before you begin sanding, ensure your stairs are free of nails, staples, and debris. Clean the surface thoroughly to avoid damaging your sanding equipment and to ensure a smooth finish.
Remove Old Finish: Use a paint stripper or chemical remover to get rid of any old finish or paint.
Repair Damages: Fill any cracks or holes with wood filler and allow it to dry completely.
Protect Surroundings: Cover nearby furniture and fixtures with plastic sheets to prevent dust from spreading.
Choosing the Right Sandpaper
Selecting the correct sandpaper grit is crucial for achieving a smooth and even surface. Start with a coarse grit (40-60) to remove the old finish and smooth out imperfections. Gradually move to finer grits (100-120) to polish the wood.
Sanding Techniques
Using the right sanding technique can make a significant difference in the final result. Here are some tips:
Hand Sanding: For detailed areas and edges, hand sanding is the best approach. Use sanding blocks for even pressure and control.
Orbital Sanders: These are ideal for larger, flat areas. Move the sander in the direction of the wood grain to avoid scratches.
Consistent Pressure: Apply even pressure throughout the sanding process to achieve a uniform finish.
Finishing Touches
Once sanding is complete, it’s time to finish your stairs. Choose a high-quality wood stain or sealant to enhance the wood’s natural beauty and protect it from future damage.
Staining: Apply wood stain evenly using a brush or cloth. Allow it to penetrate the wood, then wipe off any excess.
Sealing: Use a clear sealant to protect the wood from moisture and wear. Apply multiple coats for best results.
Conclusion
With the right techniques and tips, floor sanding your stairs can be a rewarding DIY project. By following this guide, you can restore the elegance of your wooden stairs and ensure they remain a beautiful feature in your home for years to come.


The Benefits of Using a Professional Floor Sanding Service
The Benefits of Using a Professional Floor Sanding Service Enhance the Beauty and Longevity[Read more...]
Pet-Friendly Floor Sanding Solutions
As a pet owner, maintaining beautiful wooden floors while ensuring the safety and comfort of[Read more...]
The Impact of Seasonal Changes on Sanded Floors
The Impact of Seasonal Changes on Sanded Floors Protect and maintain your wooden floors[Read more...]
The Benefits of Reclaimed Wood Floors and Sanding
The Benefits of Reclaimed Wood Floors and Sanding Your guide to sustainable and stylish[Read more...]
Floor sanding and renovation and installation services in Richmond
Richmond: A Jewel of London’s Green Boroughs Richmond is one of London’s most desirable and[Read more...]
The Environmental Impact of Floor Sanding and How to Mitigate It
Environmental Impact of Floor Sanding Floor sanding is an essential process for maintaining[Read more...]
The Best Finishes for Sanded Floors: A Comprehensive Guide
Choosing the right finish for your sanded floors is crucial in achieving the perfect look[Read more...]
How to Spot Signs That Your Floors Need Sanding
Maintain the Beauty of Your London Home with Expert Tips Introduction Wooden floors add[Read more...]
Floor sanding and renovation and installation services in Croydon
Croydon: A Dynamic and Diverse London Borough Croydon is a bustling and diverse borough located[Read more...]
Gallery 06 – Pine floor board
[Read more...]
Sep