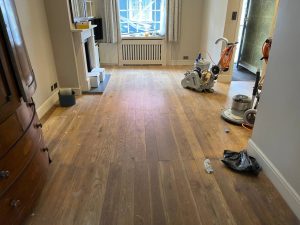
Floor sanding is a crucial step in restoring and maintaining the beauty of your wooden floors. While hiring professionals is a common choice, some homeowners in London may consider tackling the project themselves. DIY floor sanding can be rewarding but also comes with its challenges. Here’s a comprehensive guide to the pros, cons, and tips for DIY floor sanding.
Pros of DIY Floor Sanding
Cost Savings:
- Lower Costs: One of the primary advantages of DIY floor sanding is the potential cost savings. By doing the work yourself, you can save on labour costs and only pay for materials and equipment rental.
Flexibility:
- Schedule Flexibility: You have complete control over your schedule, allowing you to work at your own pace and convenience.
Satisfaction:
- Personal Achievement: Completing a DIY project can be highly satisfying. Successfully sanding your floors can give you a sense of accomplishment and pride in your work.
Cons of DIY Floor Sanding
Skill and Experience:
- Steep Learning Curve: Floor sanding requires a certain level of skill and experience. Without proper knowledge, you risk damaging your floors.
- Time-Consuming: DIY floor sanding can be time-consuming, especially for beginners who are unfamiliar with the process.
Equipment Challenges:
- Rental Equipment: Renting professional-grade sanding equipment can be expensive, and operating these machines can be challenging without experience.
- Dust and Noise: Sanding generates a significant amount of dust and noise. Managing this can be difficult without the right tools and preparation.
Quality of Finish:
- Inconsistent Results: Achieving a professional-quality finish can be challenging for DIYers. Inconsistent sanding can lead to uneven surfaces and poor results.
Tips for Successful DIY Floor Sanding
- Preparation is Key
- Clear the Room: Remove all furniture, rugs, and decorations from the room. Ensure the floor is free of nails, staples, and other debris.
- Seal Off the Area: Use plastic sheeting to seal off doorways and vents to prevent dust from spreading to other parts of your home.
- Choose the Right Equipment
- Rent Quality Sanders: Rent a drum sander for the main floor area and an edge sander for corners and edges. Ensure the equipment is in good working condition.
- Select Appropriate Sandpaper: Use a progression of grits, starting with coarse (40-60 grit) to remove old finish, medium (80 grit) to smooth the surface, and fine (120 grit) for the final pass.
- Follow Proper Sanding Techniques
- Sand with the Grain: Always sand in the direction of the wood grain to avoid cross-grain scratches.
- Keep the Sander Moving: Never let the sander sit in one spot while running. Keep it moving at a steady pace to avoid creating dips or gouges.
- Use Even Pressure: Apply even pressure while sanding to ensure a consistent finish.
- Manage Dust and Clean Thoroughly
- Use Dust Collection Systems: If available, use sanders with built-in dust collection systems to minimize dust.
- Vacuum Frequently: Regularly vacuum the floor and surrounding areas to remove dust. Use a tack cloth to pick up any remaining particles before applying the finish.
- Apply the Finish Properly
- Choose the Right Finish: Select a finish that suits your needs and preferences, such as water-based polyurethane for a clear finish or oil-based polyurethane for a warm, amber hue.
- Follow Instructions: Carefully follow the manufacturer’s instructions for applying the finish. Apply multiple thin coats rather than a single thick coat for the best results.
- Allow Adequate Drying Time: Ensure each coat of finish dries completely before applying the next. Proper ventilation can help speed up the drying process.
When to Consider Hiring Professionals
Complex Projects:
- Extensive Damage: If your floors have extensive damage or require significant repairs, hiring professionals is advisable. They have the expertise to handle complex issues effectively.
Time Constraints:
- Limited Time: If you have limited time to complete the project, professionals can finish the job more quickly and efficiently.
High-Quality Finish:
- Professional Results: For a high-quality, flawless finish, professional sanding and finishing services are often worth the investment.
Conclusion
DIY floor sanding can be a rewarding project for London homeowners looking to save money and gain a sense of accomplishment. However, it’s essential to weigh the pros and cons and be prepared for the challenges involved. With careful preparation, the right equipment, and proper techniques, you can achieve impressive results. For more complex projects or if you’re seeking a professional-quality finish, hiring experienced floor sanding professionals can be a wise investment. Whether you choose to DIY or hire experts, well-sanded floors can significantly enhance the beauty and value of your home.


Gallery 03 – Cork tile wood
[Read more...]
Sep
The Benefits of Using a Professional Floor Sanding Service
The Benefits of Using a Professional Floor Sanding Service Enhance the Beauty and Longevity[Read more...]
The Benefits of Dust-Free Floor Sanding
The Benefits of Dust-Free Floor Sanding Experience a Cleaner, Healthier Home Environment with Innovative[Read more...]
DIY Floor Sanding: Pros, Cons, and Tips
Floor sanding is a crucial step in restoring and maintaining the beauty of your wooden[Read more...]
Polishing the floor in london
[Read more...]
Expert Tips for Maintaining Sanded Floors
Sanding your wooden floors can breathe new life into your home, giving it a fresh,[Read more...]
The Best Rugs and Mats for Protecting Sanded Floors
The Best Rugs and Mats for Protecting Sanded Floors Maintain your wooden floors with[Read more...]
How to Handle Floor Scratches Before Sanding
How to Handle Floor Scratches Before Sanding Dealing with scratches on your wooden floors[Read more...]
How to Create a Seamless Transition Between Rooms with Floor Sanding
How to Create a Seamless Transition Between Rooms with Floor Sanding Achieve a uniform[Read more...]
Hardwood vs. Engineered Wood: Which is Better for Sanding?
When it comes to choosing the right flooring for your home, understanding the differences between[Read more...]