How to Incorporate Floor Sanding into Your DIY Projects
For London homeowners looking to enhance their DIY skills, incorporating floor sanding into your projects can significantly improve the look and feel of your home. Whether you’re renovating an old property or simply updating a room, understanding the basics of floor sanding can help you achieve professional-quality results. This guide will walk you through the process, providing tips and techniques to ensure your DIY project is a success.
Understanding Floor Sanding
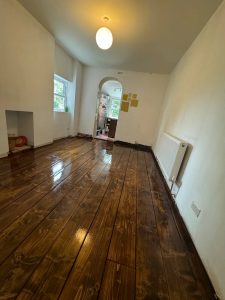
Floor sanding involves removing the top layer of a wooden floor to reveal a fresh, smooth surface. This process is essential for refinishing old floors, removing imperfections, and preparing the wood for a new finish. Proper sanding can restore the natural beauty of your floors and increase their longevity.
Preparing for Your DIY Floor Sanding Project

1. Assess the Floor Condition
Before starting, inspect your floor to determine its condition. Identify any areas that need repairs, such as loose boards, nails, or deep scratches. Address these issues before you begin sanding to ensure a smooth process.
2. Gather the Necessary Tools and Materials
Having the right tools is crucial for a successful floor sanding project. You’ll need:
- Drum sander and edge sander
- Sandpaper in various grits (coarse, medium, fine)
- Vacuum cleaner with a HEPA filter
- Protective gear (gloves, mask, goggles)
- Wood filler for repairs
3. Clear the Area
Remove all furniture, rugs, and decorations from the room. Ensure the space is clean and free of dust and debris. This preparation will make the sanding process smoother and more efficient.
Sanding Your Floors
1. Start with Coarse Grit Sandpaper
Begin by using coarse grit sandpaper (24-36 grit) to remove the old finish and level the surface. Move the sander in the direction of the wood grain to avoid scratches and achieve an even finish.
2. Progress to Medium and Fine Grits
Gradually move to medium grit (60-80 grit) and then fine grit (100-150 grit) sandpaper. This step-by-step approach ensures a smooth surface ready for finishing. Always vacuum between each sanding pass to remove dust and debris.
3. Use an Edge Sander for Corners and Edges
Edges and corners can be challenging to reach with a drum sander. Use an edge sander to tackle these areas, ensuring a consistent finish throughout the room.
Finishing Touches
1. Clean the Floor Thoroughly
After sanding, clean the floor thoroughly to remove all dust. Use a vacuum with a HEPA filter and a damp cloth to ensure the surface is dust-free before applying the finish.
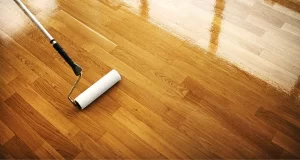
2. Apply the Finish
Choose a finish that suits your style and the floor’s use. Options include polyurethane, oil-based finishes, and wax. Apply the finish according to the manufacturer’s instructions, allowing adequate drying time between coats.
Maintenance Tips
To maintain your newly sanded and finished floors, follow these tips:
- Regularly sweep and vacuum to remove dirt and debris.
- Use protective pads under furniture to prevent scratches.
- Clean spills immediately to avoid staining.
- Refinish the floor as needed to maintain its appearance and durability.
Conclusion
Incorporating floor sanding into your DIY projects can significantly enhance the beauty and value of your London home. By following these steps and using the right tools and techniques, you can achieve professional-quality results. If you prefer professional assistance, our certified floor sanding experts are here to help. Contact us today to learn more about our services and how we can assist with your next home improvement project.


How to Deal with High Traffic Areas on Sanded Floors
How to Deal with High Traffic Areas on Sanded Floors Protect and Maintain[Read more...]
Customer Testimonials: Real Stories of Floor Sanding Success
Hearing from satisfied customers is one of the best ways to understand the value and[Read more...]
Innovations in Floor Sanding Technology
The field of floor sanding has seen significant advancements in recent years, making the process[Read more...]
The Benefits of Refinishing Your Wooden Floors
The Benefits of Refinishing Your Wooden Floors Enhance the Beauty and Value of Your[Read more...]
How to Handle Adhesive Residue Before Floor Sanding
How to Handle Adhesive Residue Before Floor Sanding Effective methods to prepare your[Read more...]
Gallery 04 – Engineering wooden floor
[Read more...]
Sep
Eco-Friendly Floor Sanding: Sustainable Practices for Your Home
As environmental awareness continues to grow, many homeowners in London are seeking ways to make[Read more...]
How to Maintain Sanded Floors in Rental Properties
How to Maintain Sanded Floors in Rental Properties Maintaining sanded floors in rental properties[Read more...]
How to Handle Mold and Mildew Before Sanding
How to Handle Mold and Mildew Before Sanding Before sanding your floors, it is[Read more...]
Floor sanding and renovation and installation services in Bromley
Bromley: A Blend of Suburban Comfort and Urban Convenience Bromley is a large and vibrant[Read more...]