The Best Tools and Equipment for DIY Floor Sanding
Ensure Professional Results in Your London Home with These Essential Items
Introduction
Embarking on a DIY floor sanding project can be a rewarding way to rejuvenate your wooden floors. To achieve professional-quality results, it’s essential to use the right tools and equipment. In this guide, we’ll outline the best tools and equipment for DIY floor sanding, helping you transform your London home with confidence.
Essential Tools for Floor Sanding
Having the right tools can make a significant difference in the quality of your floor sanding project. Here are the essential tools you’ll need:
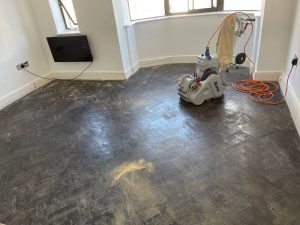
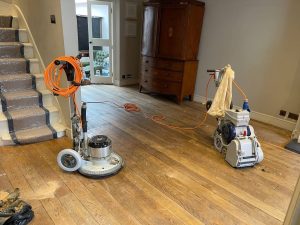
- Drum Sander: Ideal for sanding large, flat areas of your floor. A drum sander is powerful and efficient, making it a must-have for removing old finishes and smoothing the wood surface.
- Edging Sander: Used for sanding edges and corners that a drum sander cannot reach. This tool ensures a consistent finish across the entire floor.
- Orbital Sander: A versatile tool that’s perfect for finer sanding tasks and achieving a smooth finish. It’s also useful for sanding in tighter spaces.
- Detail Sander: Great for intricate areas and tight corners where larger sanders cannot reach. This tool helps ensure every part of your floor is evenly sanded.
Sandpaper and Grit Sequences
Choosing the right sandpaper is crucial for a successful sanding project. Here’s a guide to sandpaper grits you’ll need:
- 36-Grit: Coarse sandpaper used for the initial sanding pass to remove old finishes and deep scratches.
- 60-Grit: Medium grit sandpaper to smooth out the rough surface left by the 36-grit paper.
- 80-Grit: Finer grit sandpaper used to further refine the surface.
- 120-Grit: Fine sandpaper for the final pass, ensuring a smooth and even surface ready for finishing.
Additional Equipment
In addition to sanders and sandpaper, you’ll need a few more items to complete your DIY floor sanding project:
- Vacuum Cleaner: A powerful vacuum cleaner with a HEPA filter to remove dust and debris between sanding passes and after the final sanding.
- Protective Gear: Safety goggles, a dust mask, and ear protection are essential for protecting yourself from dust and noise during the sanding process.
- Plastic Sheeting: Use plastic sheeting to seal off doorways and vents to prevent dust from spreading to other areas of your home.
- Wood Filler: Fill any cracks or holes in the floor before sanding to ensure a smooth, even surface.
- Brushes and Rollers: Use these for applying stain and finish to the sanded floor, ensuring an even and professional-looking finish.
Tips for Successful DIY Floor Sanding
Follow these tips to achieve the best results from your DIY floor sanding project:
- Test Your Equipment: Before starting, test all your equipment to ensure it’s in good working condition.
- Follow Grit Sequences: Don’t skip grits when sanding. Follow the recommended sequence to achieve a smooth finish.
- Keep the Sander Moving: Always keep the sander moving to avoid creating gouges or uneven spots on the floor.
- Vacuum Between Passes: Remove dust and debris between each sanding pass to prevent scratches and ensure a clean surface.
- Work in Good Lighting: Ensure the room is well-lit so you can see the condition of the floor clearly as you sand.


How to Deal with Pet Damage on Wooden Floors
How to Deal with Pet Damage on Wooden Floors Effective solutions for maintaining beautiful[Read more...]
Why Professional Floor Sanding is Worth the Investment
Why Professional Floor Sanding is Worth the Investment Discover the Benefits of Hiring Experts[Read more...]
Sand Hard Wood Flooring
Even the best wood floors are subject to damage. With time, hardwood floors scratch, dull,[Read more...]
Floor sanding and renovation and installation services in Croydon
Croydon: A Dynamic and Diverse London Borough Croydon is a bustling and diverse borough located[Read more...]
The Benefits of Professional Floor Sanding for Offices
The Benefits of Professional Floor Sanding for Offices Maintaining the floors in your office[Read more...]
How to Maintain the Shine on Your Sanded Floors
How to Maintain the Shine on Your Sanded Floors Expert Tips for Keeping Your[Read more...]
Floor Sanding for Open-Plan Spaces: Tips and Tricks
Floor Sanding for Open-Plan Spaces: Tips and Tricks Achieve a Seamless and Beautiful Finish[Read more...]
Parquet Flooring
With parqueting bring nature into your home. Parquet flooring is different than regular wood flooring,[Read more...]
How to Spot Signs That Your Floors Need Sanding
Maintain the Beauty of Your London Home with Expert Tips Introduction Wooden floors add[Read more...]
How to Plan a Floor Sanding Project Around Your Schedule
How to Plan a Floor Sanding Project Around Your Schedule Efficient project management[Read more...]