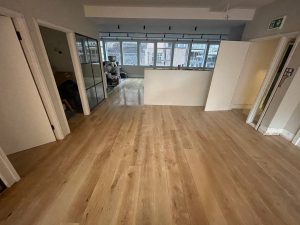
The Best Floor Sanding Techniques for Kitchens and Bathrooms
Kitchens and bathrooms are high-traffic areas that experience frequent exposure to moisture, making it essential to use the best floor sanding techniques to maintain the beauty and durability of your hardwood floors. In this guide, we’ll explore effective sanding methods and finishing options to ensure your floors stand up to the challenges of these demanding environments in your London home.
Preparation is Crucial
1. Clear the Area
Remove all furniture, appliances, and decor from the kitchen or bathroom. Ensure the space is completely clear to facilitate an efficient sanding process and prevent damage to your belongings.
2. Inspect the Floor
Examine the floor for any damage, such as loose boards, nails, or deep scratches. Address these issues before sanding to ensure a smooth and even surface. Repair any water damage or signs of rot, especially in bathrooms where moisture exposure is higher.
3. Gather the Right Tools
Having the appropriate tools is essential for successful floor sanding:
Drum sander for larger areas
Edge sander for corners and edges
Detail sander for tight spaces
Sandpaper in various grits (coarse, medium, fine)
Vacuum cleaner with a HEPA filter
Protective gear (gloves, mask, goggles)
Sanding Techniques for Kitchens and Bathrooms
1. Start with Coarse Grit Sandpaper
Begin sanding with coarse grit sandpaper (60-80 grit) to remove old finishes and level the surface. Use a drum sander for larger areas and an edge sander for corners and edges. Sand in the direction of the wood grain to avoid scratches and achieve a uniform finish.
2. Progress to Medium and Fine Grits
Once the initial sanding is complete, switch to medium grit (100-120 grit) sandpaper to smooth the surface. Finally, use fine grit (150-180 grit) sandpaper for a polished finish. Vacuum the floor between each sanding stage to remove dust and debris.
3. Use a Detail Sander for Tight Spaces
Kitchens and bathrooms often have tight spaces and intricate areas. A detail sander is ideal for reaching these spots, ensuring a consistent finish throughout the room.
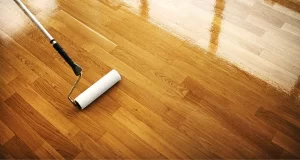
Choosing the Right Finish
The finish you choose for your kitchen or bathroom floors is crucial for protecting against moisture and wear:
1. Water-Based Polyurethane
Water-based polyurethane is a popular choice for high-moisture areas due to its durability and clear finish that doesn’t yellow over time. It dries quickly and has a low odour, making it suitable for indoor use.
2. Oil-Based Polyurethane
Oil-based polyurethane provides a rich, warm finish and excellent durability. While it takes longer to dry and has a stronger odour during application, it offers superior protection against moisture and wear.
3. Hardwax Oil
Hardwax oil penetrates the wood to provide a natural, matte finish that is easy to maintain and repair. It offers good protection against moisture and is a great option for those seeking a more natural look.
Application Tips
Proper application of the finish is key to ensuring long-lasting protection:
Preparation: Ensure the floor is clean, dry, and free of dust before applying the finish.
Stir, Don’t Shake: Stir the finish thoroughly to avoid bubbles that can affect the finish.
Apply Evenly: Use a high-quality brush, roller, or applicator pad to apply the finish evenly. Follow the wood grain to ensure a smooth finish.
Multiple Coats: Apply multiple thin coats rather than one thick coat. Allow each coat to dry completely and lightly sand between coats for the best results.
Ventilation: Ensure the room is well-ventilated during application and drying to avoid inhaling fumes and to help the finish cure properly.
Maintenance Tips
Keep your newly sanded and finished floors looking their best with these maintenance tips:
Regularly sweep or vacuum to remove dirt and debris.
Use mats or rugs in high-traffic areas and near sinks to protect the floor from water and wear.
Clean spills immediately to prevent water damage and staining.
Use furniture pads to prevent scratches and scuffs.
Refinish the floors as needed to maintain their appearance and durability.
Conclusion
Sanding and finishing floors in kitchens and bathrooms requires careful preparation, the right techniques, and proper maintenance to ensure long-lasting beauty and durability. By following these expert tips and choosing the right finish, you can protect your hardwood floors from the challenges of high-moisture environments in your London home. For professional floor sanding and finishing services, contact our experienced team today. We are dedicated to helping you achieve stunning results that enhance the beauty and functionality of your home.


The Benefits of Hiring a Local Floor Sanding Expert
The Benefits of Hiring a Local Floor Sanding Expert Enhancing Your London Home with[Read more...]
Floor sanding and renovation and installation services in Reading
Reading: A Historic Town with a Modern Edge Reading is a bustling town located in[Read more...]
Floor sanding and renovation and installation services in Essex
Essex: A County of Charm and Diversity Essex is a historic and picturesque county located[Read more...]
How to Deal with Floor Squeaks: Sanding and Repair Tips
How to Deal with Floor Squeaks: Sanding and Repair Tips Ensure Quiet and Smooth[Read more...]
Engineered Wood Flooring
Choosing the finishes for your house can be the most exciting part. Wood flooring adds[Read more...]
Sep
Floor sanding and renovation and installation services in Harlow
Harlow, located in Essex, is a thriving town with a rich history and a strong[Read more...]
Sep
Floor sanding and renovation and installation services in Greenwich
Greenwich: A Historic Gem of London Greenwich is one of London’s most historic and picturesque[Read more...]
Floor sanding and renovation and installation services in Southwark
Southwark: A Historic Heart of London Southwark is a vibrant and historic borough located on[Read more...]
The Difference Between Floor Sanding and Refinishing
The Difference Between Floor Sanding and Refinishing Understanding the Best Options for Your London[Read more...]
Floor sanding and renovation and installation services in Richmond
Richmond: A Jewel of London’s Green Boroughs Richmond is one of London’s most desirable and[Read more...]