How to Plan a Floor Sanding Project for Multi-Story Homes

Assessing the Project Scope
Before starting your floor sanding project, it’s essential to assess the scope of the work:
1. Identify Areas to Sand
Determine which floors need sanding. Consider the condition of each floor and prioritize areas that show significant wear and tear. This will help you plan the project timeline and allocate resources effectively.
2. Measure the Space
Measure the square footage of the areas to be sanded. Accurate measurements will help you estimate the amount of materials needed and provide a clearer picture of the project’s scale.
Gathering Necessary Tools and Materials
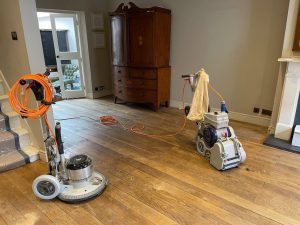
Having the right tools and materials is crucial for a successful floor sanding project:
- Drum sander for large areas
- Edge sander for corners and edges
- Detail sander for intricate areas
- Sandpaper in various grits (coarse, medium, fine)
- Vacuum cleaner with a HEPA filter
- Protective gear (gloves, mask, goggles)
- Wood filler for repairs
- Finish products (stain, polyurethane, etc.)
Preparation Steps
1. Clear the Area
Remove all furniture, rugs, and decor from the areas to be sanded. Ensure the space is completely clear to facilitate the sanding process and prevent damage to your belongings.
2. Inspect and Repair
Inspect the floors for any damage, such as loose boards, nails, or deep scratches. Use wood filler to repair any imperfections and ensure a smooth, even surface for sanding.
3. Protect Adjacent Areas
Use plastic sheeting and painter’s tape to cover doorways, vents, and adjacent rooms. This will help contain dust and prevent it from spreading throughout your home.
Sanding Techniques
1. Start with Coarse Grit Sandpaper
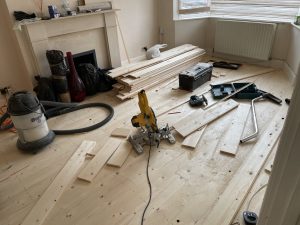
Begin sanding with coarse grit sandpaper (60-80 grit) to remove old finishes and level the surface. Use a drum sander for large, open areas and an edge sander for corners and edges. Sand in the direction of the wood grain to avoid scratches and achieve a uniform finish.
2. Progress to Medium and Fine Grits
Once the initial sanding is complete, switch to medium grit (100-120 grit) sandpaper to smooth the surface. Finally, use fine grit (150-180 grit) sandpaper for a polished finish. Vacuum the floor between each sanding stage to remove dust and debris.
3. Detail Sanding for Intricate Areas
For intricate areas, such as staircases or tight corners, use a detail sander to ensure a consistent finish. Work slowly and carefully to preserve the integrity of the wood and achieve a smooth result.
Finishing Touches
1. Clean Thoroughly
After sanding, vacuum the floors thoroughly to remove all dust. Wipe down the surface with a damp cloth to ensure it’s completely clean before applying any finish.
2. Apply the Finish
Select a finish that suits your style and the level of traffic in each area. Options include water-based polyurethane for a clear, durable finish, or oil-based polyurethane for a warm, rich look. Apply the finish according to the manufacturer’s instructions, allowing adequate drying time between coats.
3. Multiple Coats for Durability
For the best results, apply multiple thin coats of finish rather than one thick coat. This ensures a smooth, even finish and provides better protection for your floors. Lightly sand between coats with fine grit sandpaper to achieve a flawless finish.
Planning and Managing the Project
1. Create a Timeline
Develop a timeline for your project, including preparation, sanding, and finishing stages. Allow extra time for drying and curing between coats of finish. Consider the order in which you’ll sand each floor to minimize disruption to your daily routine.
2. Allocate Resources
Ensure you have all necessary tools, materials, and protective gear before starting. Plan for any assistance you might need, such as moving heavy furniture or handling large sanding equipment.
3. Communicate with Household Members
Inform household members about the project timeline and areas that will be off-limits during sanding and finishing. Clear communication will help manage expectations and ensure a smoother process.
Conclusion
Planning a floor sanding project for a multi-story home requires careful preparation, the right techniques, and effective project management. By following these expert tips, you can achieve beautiful, durable floors that enhance the overall aesthetic of your London home. For professional floor sanding and finishing services, contact our experienced team today. We are dedicated to providing high-quality solutions to keep your floors in top condition.


How to Spot Signs That Your Floors Need Sanding
Maintain the Beauty of Your London Home with Expert Tips Introduction Wooden floors add[Read more...]
Pet-Friendly Floor Sanding Solutions
As a pet owner, maintaining beautiful wooden floors while ensuring the safety and comfort of[Read more...]
Floor sanding and renovation and installation services in Reading
Reading: A Historic Town with a Modern Edge Reading is a bustling town located in[Read more...]
CLT Panels: A Modern Solution for Floor Restoration
CLT Panels: A Modern Solution for Floor Restoration At Alchemist Floor Sanding, we aim[Read more...]
Floor Sanding and Allergies: Creating a Healthier Home
Living in a vibrant city like London offers many benefits, but it also means dealing[Read more...]
How Floor Sanding Can Transform Your London Home
Living in London comes with the charm of historic architecture and classic interiors. However, maintaining[Read more...]
The Role of Floor Sanding in Allergy Prevention
The Role of Floor Sanding in Allergy Prevention Maintain a healthier home environment in[Read more...]
The Best Floor Sanding Practices for Allergy Sufferers
The Best Floor Sanding Practices for Allergy Sufferers For allergy sufferers, maintaining a clean[Read more...]
Floor Sanding for Rental Properties: Maintenance Tips
Floor Sanding for Rental Properties: Maintenance Tips Ensure Your Rental Floors Remain Beautiful and[Read more...]
How to Incorporate Floor Sanding into Your DIY Projects
How to Incorporate Floor Sanding into Your DIY Projects For London homeowners looking to[Read more...]