Floor Sanding for Open-Plan Spaces: Tips and Tricks
Achieve a Seamless and Beautiful Finish for Your London Home’s Open-Plan Areas
Introduction
Open-plan spaces are a popular design choice for modern homes, offering a sense of spaciousness and fluidity. However, sanding floors in these areas can present unique challenges. In this guide, we’ll share essential tips and tricks for sanding floors in open-plan spaces, helping you achieve a seamless and beautiful finish for your London home.
1. Plan and Prepare Thoroughly
Proper planning and preparation are crucial for a successful floor sanding project in open-plan spaces:
- Clear the Area: Remove all furniture, rugs, and personal items from the space. Ensure the floor is completely free of obstacles.
- Clean the Floor: Vacuum and mop the floor to remove dust, dirt, and debris. A clean surface ensures better sanding results.
- Repair Any Damage: Inspect the floor for any damage, such as loose boards, nails, or deep scratches. Repair these issues before starting the sanding process.
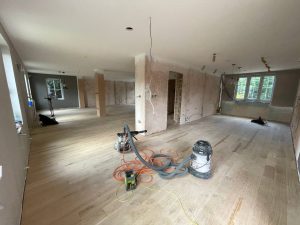
2. Choose the Right Equipment
Using the right equipment is essential for achieving a smooth finish in large open-plan areas:
- Drum Sander: Ideal for sanding large, flat areas efficiently. It is powerful and effective for removing old finishes and leveling the surface.
- Edge Sander: Used for sanding edges and corners that the drum sander cannot reach. Ensures a consistent finish across the entire floor.
- Detail Sander: Useful for intricate areas and tight spaces where larger sanders are not effective.
- Vacuum Cleaner: A vacuum with a HEPA filter is essential for cleaning between sanding passes and ensuring a dust-free surface.
3. Use Proper Sanding Techniques
Effective sanding techniques are key to achieving a seamless finish:
- Sand in the Direction of the Grain: Always sand in the direction of the wood grain to avoid scratches and achieve a smooth finish.
- Start with Coarse Grit: Begin with a coarse grit sandpaper (36-40) to remove old finishes and level the surface. Follow with medium grit (60-80) and finish with fine grit (100-120).
- Overlap Passes: Overlap each pass slightly to ensure even sanding and avoid missed spots.
- Keep the Sander Moving: Always keep the sander moving to avoid creating gouges or uneven spots on the floor.
- Edge and Detail Sanding: Use an edge sander and detail sander to reach edges and tight spaces. Ensure these areas are sanded smoothly and consistently with the main floor.
- Vacuum Between Passes: Clean the floor thoroughly with a vacuum after each sanding pass to remove dust and debris. This ensures a clean surface for the next sanding stage.
4. Address Transition Areas
Open-plan spaces often have transition areas between different rooms or zones. Pay special attention to these areas to ensure a seamless look:
- Feathering Technique: Use the feathering technique to blend the sanding passes in transition areas. This involves gradually reducing the pressure and grit size to create a smooth transition.
- Consistent Sanding: Ensure that the sanding in transition areas is consistent with the rest of the floor to avoid noticeable differences in texture or colour.
5. Staining and Finishing
Applying a finish is the final step in achieving a beautiful open-plan floor:
- Choose the Right Stain: If you wish to change the colour of your floor, choose a stain that complements your home’s decor. Test the stain on a small area to ensure it meets your expectations.
- Apply Evenly: Use a brush, roller, or applicator pad to apply the stain evenly across the floor. Follow the manufacturer’s instructions for drying times.
- Protective Finish: Apply a protective finish, such as polyurethane, to seal and protect the wood. Water-based finishes dry quickly and have low VOC levels, while oil-based finishes offer greater durability.
- Multiple Coats: Apply multiple coats of finish, allowing each coat to dry thoroughly before applying the next. Lightly sand between coats for a smooth, even finish.
6. Maintenance Tips
Proper maintenance is essential for keeping your open-plan floors looking beautiful:
- Regular Cleaning: Sweep or vacuum regularly to remove dirt and debris. Use a damp mop with a mild cleaner designed for wooden floors.
- Protect from Moisture: Avoid excessive water and clean up spills immediately to prevent water damage.
- Use Rugs and Mats: Place rugs in high-traffic areas and entryways to reduce wear and tear. Use non-slip pads to prevent movement.
- Furniture Pads: Attach felt pads to the legs of furniture to prevent scratches and dents.


Why Floor Sanding is Essential for London Homes
Introduction Floor sanding is a crucial maintenance task for homeowners in London. It goes beyond[Read more...]
How to Prepare for Floor Sanding with Pets in the House
How to Prepare for Floor Sanding with Pets in the House Preparing for floor[Read more...]
The Best Rugs and Mats for Protecting Sanded Floors
The Best Rugs and Mats for Protecting Sanded Floors Maintain your wooden floors with[Read more...]
The Best Floor Sanding Techniques for High-Traffic Areas
The Best Floor Sanding Techniques for High-Traffic Areas Maintaining the beauty and durability of[Read more...]
Gallery 06 – Pine floor board
[Read more...]
Sep
Understanding Grit Sequences in Floor Sanding
Understanding Grit Sequences in Floor Sanding Achieving the Perfect Finish for Your London Home[Read more...]
The Best Floor Sanding Practices for Allergy Sufferers
The Best Floor Sanding Practices for Allergy Sufferers For allergy sufferers, maintaining a clean[Read more...]
CLT Panels: A Modern Solution for Floor Restoration
CLT Panels: A Modern Solution for Floor Restoration At Alchemist Floor Sanding, we aim[Read more...]
Gallery 03 – Cork tile wood
[Read more...]
Sep
Floor Sanding for Different Types of Wood: A Guide
Floor Sanding for Different Types of Wood: A Guide Ensure the Best Results for[Read more...]