How to Achieve a Smooth Finish on Your Sanded Floors

Expert Tips for Professional-Quality Results in Your London Home
Introduction
Sanding your wooden floors can transform their appearance and enhance the overall look of your home. However, achieving a smooth, professional-quality finish requires careful attention to detail and the right techniques. In this guide, we’ll share expert tips to help you achieve a flawless finish on your sanded floors in your London home.
1. Prepare Your Floors Thoroughly
Proper preparation is key to achieving a smooth finish:
- Clear the Room: Remove all furniture, rugs, and personal items from the room to ensure an unobstructed work area.
- Repair Any Damage: Fill in any cracks, gaps, or holes with wood filler. Secure loose boards and replace any damaged sections.
- Clean the Floor: Sweep and vacuum the floor thoroughly to remove dust, dirt, and debris.
2. Choose the Right Sandpaper
Using the correct sandpaper grits is essential for a smooth finish:
- Start with Coarse Grit: Begin with a coarse grit (36-40) to remove old finishes and level the surface.
- Progress to Medium Grit: Use a medium grit (60-80) to smooth out scratches from the coarse grit and refine the surface.
- Finish with Fine Grit: Complete the sanding process with a fine grit (100-120) to achieve a smooth and even finish.
3. Use Proper Sanding Techniques
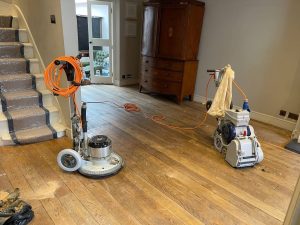
Effective sanding techniques can make a significant difference:
- Keep the Sander Moving: Always keep the sander moving to avoid creating gouges or uneven spots on the floor.
- Sand with the Grain: Sand in the direction of the wood grain to prevent scratches and achieve a smoother finish.
- Overlap Passes: Overlap each pass slightly to ensure even sanding and avoid missed spots.
- Edge and Corner Sanding: Use an edging sander or detail sander to reach edges and corners that the main sander cannot access.
4. Clean Between Sanding Passes
Cleaning the floor between sanding passes helps remove dust and debris:
- Vacuum Thoroughly: Use a vacuum cleaner with a HEPA filter to capture fine dust particles between each sanding pass.
- Wipe Down Surfaces: Wipe the floor with a damp cloth to remove any remaining dust and ensure a clean surface for the next sanding pass.
5. Apply the Finish Carefully
Applying the finish correctly is crucial for a smooth and durable result:
- Choose the Right Finish: Select a finish that suits your floor type and desired appearance. Options include oil-based, water-based, and polyurethane finishes.
- Follow Manufacturer Instructions: Carefully follow the manufacturer’s instructions for application, drying times, and curing times.
- Apply Even Coats: Apply the finish in thin, even coats using a brush, roller, or applicator pad. Avoid thick coats that can lead to uneven drying and bubbling.
- Allow Adequate Drying Time: Allow each coat to dry fully before applying the next. This ensures a smooth, even finish and prevents imperfections.
6. Buff Between Coats
Buffing between coats can enhance the final finish:
- Use a Fine Abrasive Pad: Lightly buff the floor with a fine abrasive pad or very fine sandpaper (220-grit) between coats to smooth out any imperfections.
- Clean Thoroughly: Vacuum and wipe down the floor after buffing to remove all dust and debris before applying the next coat.
7. Final Inspection and Touch-Ups
Before considering the job complete, perform a final inspection:
- Check for Imperfections: Look for any missed spots, bubbles, or uneven areas. Sand and reapply finish to these areas if necessary.
- Ensure a Smooth Finish: Run your hand over the surface to feel for smoothness. A perfectly sanded and finished floor should feel smooth to the touch.


The Science Behind Floor Sanding: Understanding the Process
Floor sanding is more than just a cosmetic enhancement; it’s a precise process that involves[Read more...]
The Best Rugs and Mats for Protecting Sanded Floors
The Best Rugs and Mats for Protecting Sanded Floors Maintain your wooden floors with[Read more...]
The Impact of Seasonal Changes on Sanded Floors
The Impact of Seasonal Changes on Sanded Floors Protect and maintain your wooden floors[Read more...]
Understanding Grit Sequences in Floor Sanding
Understanding Grit Sequences in Floor Sanding Achieving the Perfect Finish for Your London Home[Read more...]
The Best Floor Sanding Practices for Older Homes
The Best Floor Sanding Practices for Older Homes Older homes in London often feature beautiful[Read more...]
Top Floor Sanding Trends in 2024
As we move into 2024, floor sanding and finishing techniques continue to evolve, blending innovation[Read more...]
Wood floor nailing
[Read more...]
How to Choose the Right Floor Sanding Finish for Your Lifestyle
How to Choose the Right Floor Sanding Finish for Your Lifestyle Find the Perfect[Read more...]
The Benefits of Refinishing Over Replacing Your Floors
The Benefits of Refinishing Over Replacing Your Floors Why refinishing is a cost-effective[Read more...]
The Best Finishing Techniques for Sanded Hardwood Floors
The Best Finishing Techniques for Sanded Hardwood Floors Hardwood floors are a timeless feature[Read more...]