Sanding floors with decorative inlays requires special attention and techniques to preserve their intricate designs and enhance their beauty. Whether you have intricate wood patterns or mixed-material inlays, proper sanding can maintain the integrity of your inlaid floors. This guide provides expert tips for sanding floors with decorative inlays in your London home.
Understanding Decorative Inlays
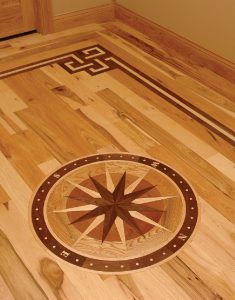
Decorative inlays are intricate designs created by embedding different types of wood or materials into the floor. These inlays add a unique aesthetic appeal but require careful handling during the sanding process to avoid damage.
Preparation Steps
1. Inspect the Inlays
Carefully inspect the inlays for any damage or loose pieces. Repair any issues before sanding to ensure a smooth and even surface. This may involve re-gluing loose inlays or filling gaps with wood filler.
2. Clean the Floor
Remove all furniture, rugs, and debris from the room. Clean the floor thoroughly with a vacuum cleaner and a damp cloth to remove dust and dirt. This preparation ensures a clean working surface and prevents debris from scratching the floor during sanding.
3. Gather the Right Tools
Having the appropriate tools is essential for successful sanding:
Orbital sander or belt sander for large areas
Detail sander for intricate inlay work
Sandpaper in various grits (coarse, medium, fine)
Vacuum cleaner with a HEPA filter
Protective gear (gloves, mask, goggles)
Sanding Techniques
1. Start with Coarse Grit Sandpaper
Begin sanding with coarse grit sandpaper (60-80 grit) to remove old finishes and level the surface. Use an orbital or belt sander for larger areas and a detail sander for the inlay sections. Sand in the direction of the wood grain to avoid scratches and ensure a uniform finish.
2. Be Gentle with Inlays
When sanding areas with decorative inlays, use a lighter touch to avoid damaging the intricate designs. A detail sander is ideal for these sections, allowing you to carefully sand around the inlays without causing harm.
3. Progress to Finer Grits
Gradually move to medium grit (100-120 grit) and then fine grit (150-180 grit) sandpaper to smooth the surface. Vacuum the floor between each sanding stage to remove dust and debris, ensuring a clean surface for the next pass.
4. Hand Sand Intricate Areas
For very intricate inlay designs, consider hand sanding with fine grit sandpaper. This allows for precise control and minimizes the risk of damaging the inlays. Work slowly and carefully to maintain the integrity of the design.
Finishing Touches
1. Choose the Right Finish
Select a finish that enhances the beauty of the inlays and provides durable protection. Water-based polyurethanes are a good choice for clear finishes that do not yellow over time. Oil-based polyurethanes offer a rich, warm finish but may darken the wood slightly.
2. Apply Finish Evenly
Apply the finish evenly using a high-quality brush, roller, or applicator pad. Follow the manufacturer’s instructions for application and drying times. Ensure the room is well-ventilated during the finishing process to facilitate proper drying and curing.
3. Multiple Coats for Durability
For the best results, apply multiple thin coats of finish rather than one thick coat. This ensures a smooth, even finish and provides better protection for your floors. Lightly sand between coats with fine grit sandpaper to achieve a flawless finish.
Maintenance Tips
Keep your newly sanded and finished inlaid floors looking their best with these maintenance tips:
Regularly sweep or vacuum to remove dirt and debris.
Use a damp mop with a hardwood floor cleaner for deeper cleaning, but avoid excessive water.
Place mats at entryways to catch dirt and moisture.
Use furniture pads to prevent scratches and dents.
Refinish the floors as needed to maintain their appearance and durability.
Conclusion
Sanding floors with decorative inlays requires careful preparation, the right techniques, and proper finishing to preserve their intricate designs and enhance their beauty. By following these expert tips, you can ensure your inlaid floors in your London home remain stunning and durable. For professional floor sanding and finishing services, contact our experienced team today. We are dedicated to providing high-quality solutions to keep your floors in top condition.


DIY Floor Sanding: Pros, Cons, and Tips
Floor sanding is a crucial step in restoring and maintaining the beauty of your wooden[Read more...]
How to Maintain Sanded Floors in Rental Properties
How to Maintain Sanded Floors in Rental Properties Maintaining sanded floors in rental properties[Read more...]
Engineered Wood Flooring
Choosing the finishes for your house can be the most exciting part. Wood flooring adds[Read more...]
Sep
How to Achieve a Modern Look with Sanded Floors
How to Achieve a Modern Look with Sanded Floors Transforming your floors[Read more...]
Lime washing /liming/whitening
[Read more...]
Floor sanding and renovation and installation services in Southwark
Southwark: A Historic Heart of London Southwark is a vibrant and historic borough located on[Read more...]
What to Expect During a Floor Sanding Project
What to Expect During a Floor Sanding Project Preparing for a Smooth and Successful[Read more...]
The Costly Mistake of Improper Lead Paint Removal
The Costly Mistake of Improper Lead Paint Removal If your home was built[Read more...]
Repairs
[Read more...]
The Role of Sealing in the Floor Sanding Process
The Role of Sealing in the Floor Sanding Process Enhancing the Durability and Appearance[Read more...]