How to Sand Floors in Small Spaces: Tips and Tricks
Sanding floors in small spaces can be a challenging task, but with the right approach and tools, you can achieve professional-quality results. Whether you’re looking to refresh a small bedroom, hallway, or closet in your London home, this guide provides expert tips and tricks to help you sand floors in tight areas effectively.
Preparation is Key
1. Clear the Space
Remove all furniture, rugs, and decorative items from the room. Ensure the area is completely clear to allow for easy movement and to prevent any damage to your belongings.
2. Inspect the Floor
Examine the floor for any damage, such as loose boards, nails, or deep scratches. Address these issues before sanding to ensure a smooth and even surface.
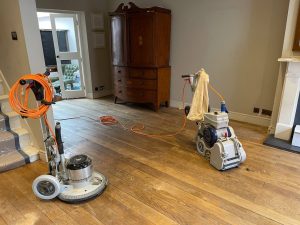
3. Gather the Right Tools
For small spaces, you’ll need specific tools to make the job easier:
- Orbital sander or hand-held belt sander
- Edge sander for corners and edges
- Sandpaper in various grits (coarse, medium, fine)
- Vacuum cleaner with a HEPA filter
- Protective gear (gloves, mask, goggles)
Sanding Techniques for Small Spaces
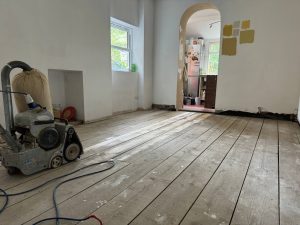
1. Start with Coarse Grit Sandpaper
Begin by sanding with coarse grit sandpaper (60-80 grit) to remove old finishes and level the surface. Use an orbital sander or hand-held belt sander for better control in small spaces. Sand in the direction of the wood grain to avoid scratches.
2. Use an Edge Sander
An edge sander is essential for reaching corners and edges that the main sander can’t access. Carefully sand these areas to ensure a consistent finish throughout the room.
3. Progress to Medium and Fine Grits
Once the initial sanding is complete, switch to medium grit (100-120 grit) sandpaper to smooth the surface. Finally, use fine grit (150-180 grit) sandpaper for a polished finish. Vacuum the floor between each sanding stage to remove dust and debris.
4. Sand Evenly
In small spaces, it’s crucial to sand evenly to avoid creating low spots or uneven areas. Move the sander slowly and steadily, overlapping each pass slightly to ensure a uniform finish.
Dust Management
Dust can quickly accumulate in small spaces, so effective dust management is essential:
- Use a vacuum with a HEPA filter to clean up dust frequently during the sanding process.
- Seal off doorways and vents with plastic sheeting to prevent dust from spreading to other parts of your home.
- Wear a dust mask and goggles to protect yourself from inhaling dust particles.
Finishing Touches
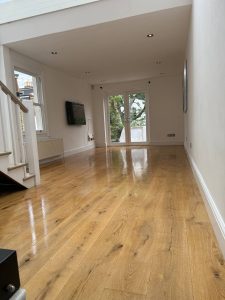
1. Clean Thoroughly
After sanding, vacuum the floor thoroughly to remove all dust. Wipe down the surface with a damp cloth to ensure it’s completely clean before applying any finish.
2. Choose the Right Finish
Select a finish that suits your style and the level of traffic in the area. Options include water-based polyurethane for a clear, durable finish, or oil-based polyurethane for a warm, rich look. Apply the finish according to the manufacturer’s instructions, allowing adequate drying time between coats.
3. Apply Multiple Coats
For the best results, apply multiple thin coats of finish rather than one thick coat. This ensures a smooth, even finish and provides better protection for your floors.
Maintenance Tips
Keep your newly sanded floors looking their best with these maintenance tips:
- Regularly sweep or vacuum to remove dirt and debris.
- Use protective pads under furniture to prevent scratches.
- Clean spills immediately to avoid staining.
- Refinish the floors as needed to maintain their appearance and durability.
Conclusion
Sanding floors in small spaces requires careful preparation, the right tools, and effective techniques. By following these tips and tricks, you can achieve a beautiful, professional-quality finish in even the tightest areas of your London home. For professional floor sanding services, contact our experienced team today. We are dedicated to helping you achieve stunning results that enhance the beauty and functionality of your home.


The Best Hardwood Species for Floor Sanding
The Best Hardwood Species for Floor Sanding Enhance Your London Home’s Floors with the[Read more...]
The Best Maintenance Practices for Sanded Floors in Humid Climates
The Best Maintenance Practices for Sanded Floors in Humid Climates Keep your London home’s[Read more...]
floorboard replacement
[Read more...]
Floor Sanding for Different Types of Wood: A Guide
Floor Sanding for Different Types of Wood: A Guide Ensure the Best Results for[Read more...]
Floor sanding and renovation and installation services in Kingston
**Kingston: A Vibrant Historic City** Kingston is a vibrant and historic town located along the[Read more...]
How to Handle Floor Stains from Spills and Accidents
How to Handle Floor Stains from Spills and Accidents Spills and accidents are inevitable,[Read more...]
How to Deal with Pet Damage on Wooden Floors
How to Deal with Pet Damage on Wooden Floors Effective solutions for maintaining beautiful[Read more...]
Wood Floor Maintenance
[Read more...]
How to Maintain the Shine on Your Sanded Floors
How to Maintain the Shine on Your Sanded Floors Expert Tips for Keeping Your[Read more...]
Lime washing /liming/whitening
[Read more...]